Friday, November 20, 2009

Color Isolation

Hello again! As well as reviews, terminology and the latest news in the camera world, you will also find tutorials here! And here’s the first!!!

For this tutorial you will require Photoshop & Camera Raw

In this tutorial I’m going to bring more attention to something in your photo. This is great if the picture is a little bit cluttered or you feel like being artsy-fartsy. Ha ha ha, my edition of Microsoft Word recognises the word “artsy” but not “fartsy”. But back on topic, the example I’m using is a promotional picture for my graphic design business Blue Crane. One of our promotional tools is an origami crane with some of our contact details on it, but in the photo it’s a little bit lost amongst all the background colour. To remedy this I’m going to get rid of every colour except the Blue Crane blue. So lets get started!


Bam! There’s the original picture and as you can see I’ve already pulled focus towards the crane by using a large aperture to blur the background, but more on apertures in the next post. So the first step is to open the image in Adobe Camera Raw. To do this on a Mac you just simply drag your RAW file (remember the talk we had about RAW images?) from the finder into Photoshop and Photoshop will launch Camera Raw automatically. On windows I’m not sure, but just try opening the picture and hope for the best. So when it opens it should look like this.


To start with lets go up to the HSL/Grayscale tab.


Since we are just interested in turning colours into black and white, click on the saturation tab. I want the blue to be the only colour left in this photo, so drag every colour slider EXCEPT blue all the way to the left.


You should pretty much see the desired result immediately, but let’s do a little bit more touching up. I’m going to boost the blue up a little bit more in the saturation department to +30.


So now let’s go back to the basics tab and up the clarity. I like really sharp images so I’m going to +100, but you do what you think looks right.


Then go up to the contrast tab and I’m just going to up it +30 and that will just be our little secret. But if you tell anyone…I’ll never be your friend again!!!!!


Now that we are done with that, let’s go up to the Lens Corrections tab.


What we are doing here is adding some Lens Vignetting. This is a really useful tab if you are shooting without a Lens Hood as it can add/remove the glare around the edges of your pictures, but we are going to use it artistically. I’m dragging it down to -100 and the midpoint to -30.


And viola! We are done. Now let’s take a look at that final picture.

Friday, November 13, 2009

$oftware!!!! Which One Do I Need And What's It Gonna Cost Me?

Aloha! I wanted to write a tutorial on an easy image editing technique today, but before I go into detail on using Camera Raw, I think I’ll write about some different pieces of software that are good to have.

As a photographer you are probably going to take hundreds upon hundreds of photos and you are probably going to want a program that can keep track of all these. Of course when you buy a camera it usually comes with software that will transfer your photos and organise them for you. When you buy a Nikon for example, it comes with ViewNX. I thought ViewNX was a pretty good program for a while but gradually it started to break down. By this I mean the icon previews in some of the first picture folders I created have started to play a game called musical previews where they swap themselves around and now I don’t know what the picture is actually of until I open it. Devastating? No, not really, but it is annoying. Lucky for me (and you) plenty of other software companies have created some really useful programs. There are heaps of them out there, but I’m just going to talk about some of the most popular ones.

Lets start with one that everyone can use! Adobe Lightroom is a useful little program that not only organises your pictures but also has quite a few other features as well. Lets take a look!

  • Easy to organize image collections
  • Basic editing options for both RAW and JPEG file types
  • Slideshow capabilities
  • Layout option and preferences for printing
  • Can create image galleries and upload them to the web for a portfolio

Sounds pretty good huh? But maybe you want some more image editing capabilities. Well if you happen to be a Mac user, then you need Aperture.

Aperture 2.0 was released on February 12, 2008 and is a very similar program to Lightroom, but with Aperture you can download more than 70 plug-ins! It also has other useful features like being able to zoom in to 1600% and even more image editing options than lightroom, but come on! 70+ plug-ins!!!! You know that some of them have got to be awesome.


Of course if image editing is what you are really interested in, then you have to go with Photoshop. I’m sure that almost all of you have heard about this one as it is arguably one of the most widely used programs in the Adobe community. Photoshop offers thousands of editing options ranging from idiot proof to professional and it’s one drawback when compared to Lightroom or Aperture WAS that it couldn’t work with RAW files, but this has been mended with the introduction of the plug-in Camera Raw.

As you may remember from my last post where I briefly talked about RAW files, they are basically like Digital Negatives, hence the file extension .DNG. Although different companies use different extensions. Nikon for example calls them .NEF. When you switch through the different modes on your camera using the little wheel on the top you are actually making little changes to the ISO, shutter speed and other things. When you take the picture as a JPEG it applies all of this to the photo, then compresses it, causing a loss of quality. When you take the photo as a RAW file it keeps the information with the file, but doesn’t compress it. This means that you can change all the information later and you wont lose photo quality. Very useful. In Camera Raw you can make changes to all of those things AND it’s all done using sliders, making the process even simpler.And while on topic, one of the best things about Camera Raw is that it’s free! This is going to play a major roll in deciding which editing/organising software you go with. Let’s look at some prices

Aperture 2 will set you back $199, but is only $99 if you are upgrading from Aperture 1. Lightroom is $299, but once again only $99 to upgrade. Now as Photoshop is editing software it is going to cost you quite a bit more. $999 to buy it outright and $349 to upgrade from Photoshop CS3, but don’t fear, there are savings to be had! You can get a toned down version for $699 or a very basic version called Photoshop Elements for a limited time only price of $79.99! Then there is the Creative Suite bundles where you can get both Photoshop AND Lightroom in the same package! As well as a bunch of other programs you probably wont use unless you get into the graphic/web design field.


Well, I hope this has given you something to think about and you can look foreword to some tutorials where we will actually be using some of these programs to create MASTERPIECES!!!!!! Or at the very least help give your pictures a little something more.

Sunday, November 8, 2009

Choosing The Right Camera For You Part 2 aka Dude, What's My Start Up Time?

Welcome back to my post on choosing the right camera for you. I’m going to continue on with my list of camera features, starting up with start up times.


Start up time - If you are going to be shooting celebrities at their worst then this one is going to be VERY important to you. Different cameras start up at different speeds. I have always been impressed with the start up speed of the D60 despite the integrated cleaning system. You see, when my camera starts up the low pass filter vibrates to shake off any dust that may have settled on it to ensure clean crisp pictures. It also does this when I turn it off. And if you are interested, it also has a little air blowing system that directs dust away from the sensor. Fancy huh? I can’t say that I personally have been in too many situations where I have wanted to grab my camera and shoot pictures as quick as I could, but if you are going to be shooting sports or paparazzi style then this should be something you look up, as well as the FPS rate.


FPS - or “Frames Per Second” is how many pictures you can take in one second. Makes sense huh? The D60 takes 3 frames per second which works for me but there are faster ones out there. What you need here will again depend on what you want to shoot. If you want to shoot action you’ll need something faster than if you want to do landscapes.


Pixels - Some people will say “mine has more pixels, mine’s better!” but in some cases that’s just not true. If you have an APS-C sensor in two cameras, one with 12mp (mega pixels) and the other has something crazy like 30mp, the sensor size is the same and you are trying to squeeze much more information into the same sized space, so the information is going to spill into the surrounding pixels and this is called “Blooming”. Not good. Because of this I wouldn’t base which camera I got off of which had the most pixels, but instead have a look at the quality f the pictures produced. There are plenty of websites that review specific cameras and it wont be hard to find sample shots.


Here is an example of blooming. It's not a great example because my camera controls bloom quite well, but you can see the light around the computer screen spilling into the surrounding pixels, creating a slight glow.

Buffer Time - Something to take into consideration when talking about shooting rate is the buffer rate or how long it can keep up the pace. DSLRs can shoot in different formats. In different cameras there are different options so I’ll stick with mine. I can shoot in three different JPEG formats; Basic (0.6mb) Norm (1.0mb) and Fine (1.9mb). Then there is the RAW format that is basically like a digital negative and allows for much more freedom in post-production, but takes up much more size (11mb). Then after that there is RAW+Basic which does exactly what it says, capturing the image in two files, one RAW and one basic JPEG (13mb). Larger files take longer to save to a memory card and while your camera is trying to save the files it can’t take more photos so you need to find a happy medium for the speed you need.


Durability - This isn’t just about how high you can drop the camera from without snapping it, it’s also how well it is protected from the elements like rain and dust. Someone who is going to be doing photo-journalism and taking pictures in deserts and war zones will really need to think about this, but also people like me who want to take photos at gigs. Think about all the arms and legs flailing about, as well as the beer and cigarettes flying about in the air. The do make element proof cameras, but this will add to the weight. Keep in mind that you can buy water and weather proof covers.


Battery expansion packs - If you are planning on photographing sporting events or even fashion events, you are going to need to have your camera on for long periods of time. Camera battery life is usually measured in exposures. But even if it has a shorter than average battery life, you can get battery expansion packs and some of them even have memory card expansions packs built in with them.


A Sony battery pack. Notice the extra buttons? Many battery expansion packs will also have controls such as another shutter release on them in odd places, until you go to shoot in portrait and find that it is just amazingly convenient.

Other features - there are heaps of other features that might help you decided upon which camera you want to buy. Some of these are like “Auto Image Bracketing” which takes three photos with you release the shutter; one over exposed, one under and one perfectly exposed and you can set the exposure increments of these. This is a feature I wish I knew about before I bought my camera because mine doesn’t have it and it makes taking HDR photos sooooo much easier. Once again, another post for another day. Then there is in-camera photo editing and things like the ability to take your photos and turn them into a stop motion movie, or even being able to shoot HD movies. After that there is the capability to release the shutter remotely, via cable or a remote, and some remotes can control different functions on the camera, depending on the model. Some camera models even support Eye-fi cards, which are memory cards that can wirelessly transmit your pictures to your computer and/or storage device. One last awesome feature that onOne has created, an Iphone app that can work like a remote, but allow you to see what would normally be displayed on the LCD screen. It's sort of like a wireless Live View system, but you can also adjust your settings via your phone. How awesome is that!?!?!?! Read more about that particular feature by onOne Software here.

Thanks for reading and I hope that this has helped you understand the world of DSLR's a little bit better. Keep on coming back for my next article on apertures! If you have any questions, please feel free to ask, because that's how you learn, by asking. =)

Friday, November 6, 2009

Pictures from Singapore!

As most of you will know, Nuffnang recently sent a bunch of us bloggers to Singapore for the Inaugural Blogger Awards. Hence the posts Below that got me there! While in Singapore I took close to 730 photos, but here are just some of the ones that I did a little work on.


Nikki with Audrey and Grace


Martin from Nuffnang with Imogen


Nikki and Candice pretending to be mannequins


Nikki pretending to be Godzilla


Nikki and me! But I'm a little hard to see

Thanks again NuffNang!

Wednesday, November 4, 2009

Choosing The Right Camera For You! aka Big Camera, Little Budget Part 1

Sorry for the Late Post! I was actually hoping to post every Monday with information and then another day during the week with some stuff for you to try out with your camera at home, but packing and doing work for clients stood in the way. But without further adieu, I give you the first post!


So you are in the market for a DSLR eh? Well the first thing that you’ll probably want to know is what DSLR means! Well it stands for Digital Single Lens Reflex which for some people (myself included when I first heard it) might mean much.
• The lens part covers the Single Lens (SL). In a DSLR the subject (what ever you are photographing) travels through the lens, through a series of hinged mirrors inside the camera and finally through the view-finder that you are looking in.
• Reflex (R) refers to the image being reflected by the mirrors.
• All of this is then digitally recorded (D) when you’re happy with what you’re seeing. You press the shutter release, the mirrors fold up and out of the way and the image is recorded onto the image sensor inside.

This is why most people who are used to smaller digital cameras or “point-and-shoots” using a DSLR for the first time will hold the camera in-front of them and wonder why the image isn’t being displayed on the screen. Of course “Live View” is now a feature being sported by some of the newer DSLRs on the market (Particularly by Sony) but more on that later.

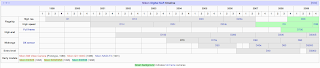
Let’s get into choosing a camera. Almost every photographer has an opinion on what camera you should buy and which brand is the best, but in MY opinion, the best camera is the camera that is right for you. You might say “WELL DUH!!!!” but let me explain… Different cameras are created for different uses. Obviously there are the different levels of professionalism; entry, mid-level, high-end and occasionally even flagship ranges (usually upgraded versions of the company’s best cameras and full of excellent features you will probably never use). A good indicator of where the camera you are looking at sits in the entry-flagship range is the price, but if you are a Nikon fan you can just look at this table:


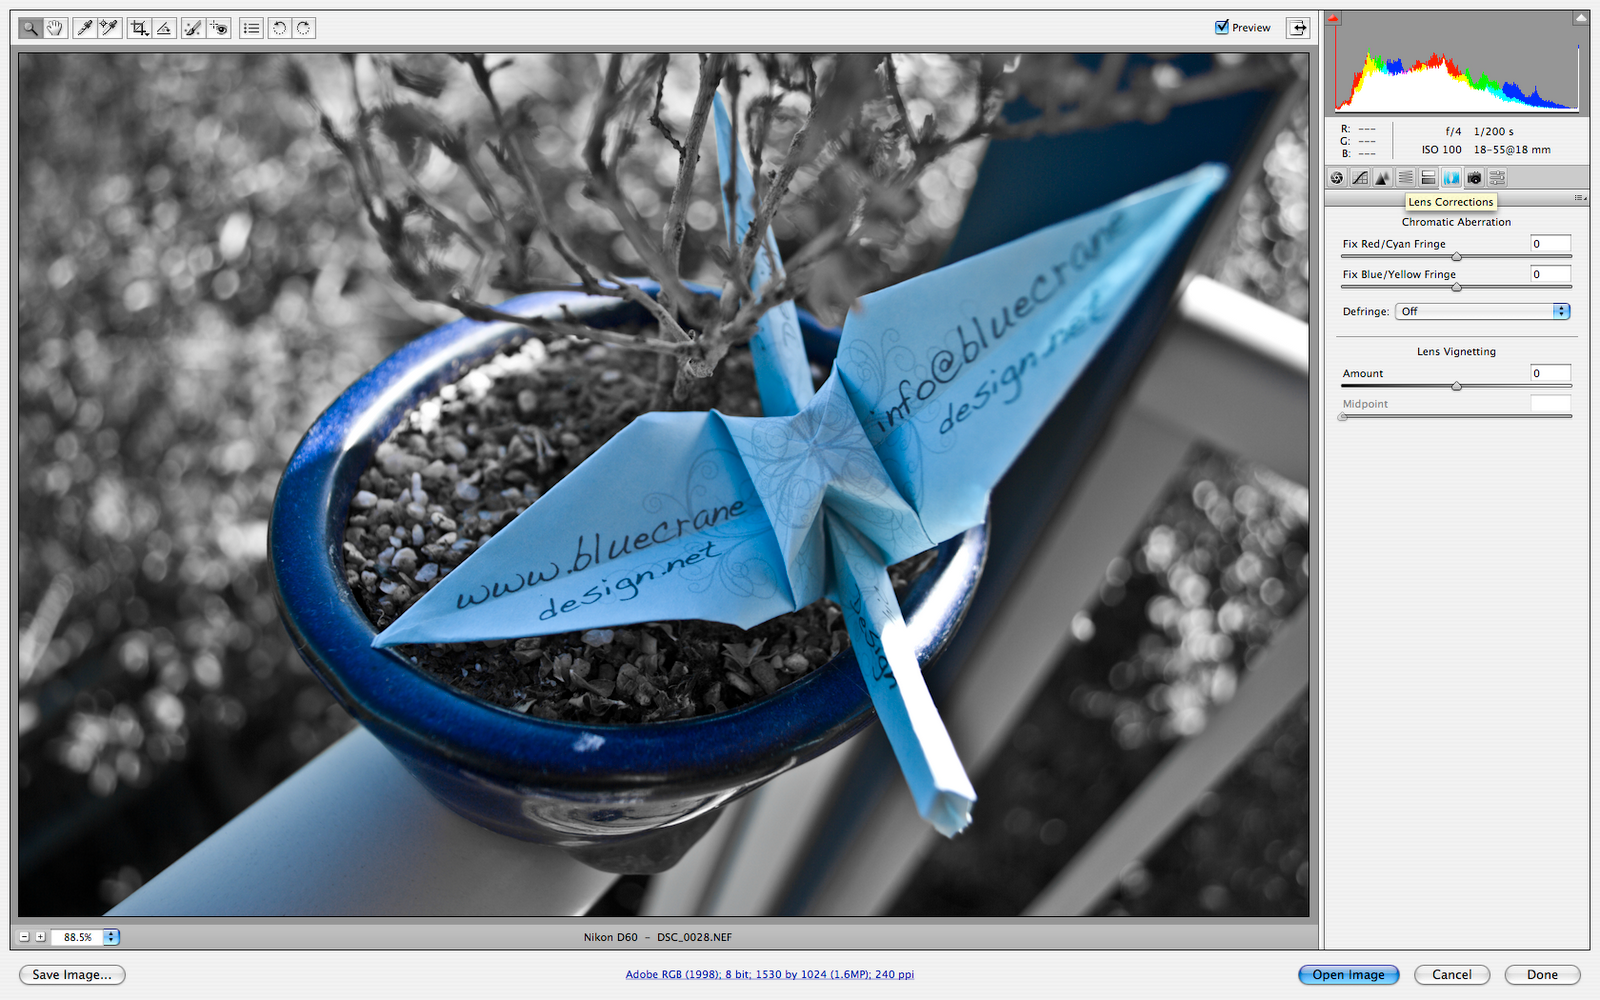
If you are not yet following a brand like a religious cult then it’s a good idea to have a think about what kind of photography you want to get into. You may be interested in doing sports photography, paparazzi, family portraits, fashion, landscapes, stock images or my personal favourite, music photography. What you want to shoot should have a strong impact on which camera you end up with. For example, if you are going to be shooting landscapes then you are probably going to be doing a bit of climbing/hiking so you’ll want a smaller lightweight camera to pack into your backpack. I chose the Nikon D60 because it was in my price range (I paid about AUD$800) and did a good job at controlling noise at higher ISO’s which means that shots in the dark would come out clearer. I’m starting to get into details, so get right down into what you should be looking for in a camera.

So what do all these random acronyms mean and what should you be looking for?

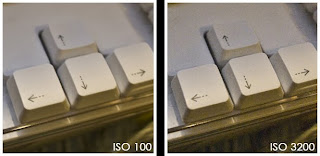
ISO - ISO, strangely enough, stands for “International Standards Organizations”. The ISO measures the sensitivity of your camera’s image sensor. The higher the ISO, the more sensitive to light your sensor is, the faster the shutter speed you can use. In most cameras the bottom ISO is 100, although some of the more expensive ones can go down to 50, and the number doubles every setting you go up. 100, 200, 400, 800, 1600 and sometimes 3200 or “Hi-1”. Unfortunately the higher ISO you use, the grainier your pictures will come out. This grain is referred to as “Noise” and different cameras handle noise better, so watch out for that! You can see a quick comparison shot I knocked up below. Click the image to make it bigger.


Aperture - Raising the ISO isn’t the only way to achieve a faster shutter speed, you can also widen the Aperture. Now, the aperture is inside the lens, but most cameras on the market come with kit lenses, so I’m going to say this will influence your choice of camera anyway. Most kit lenses will have a Maximum aperture of 3.5 which is pretty good, but there are two wider ones below that, the 2.8 and the 1.4 which will allow you to take much faster photos. Each level you go up or down are referred to as “F stops” and the aperture of the lens will appear as f3.5 (for example).

Lenses available - Staying in the topic of lenses, every lens on the market will NOT fit every camera on the market. For example - I’m interested in buying a Sigma APO 50-150mm F2.8 II EX DC HSM which will fit a Canon, Sigma and a Nikon camera, but not a Sony or Panasonic. However Minolta makes lenses for Sony that wont fit Nikon. So it’s a good idea to have a think about how much range of lenses you will have available to you.

Vibration reduction - Vibration reduction has different names in different companies who all think they have the best system. Nikon calls it VR for Vibration Reduction, Canon has IS for Image stabilization, Sigma has OS for Optical stabilisation and I’m sure other companies have other terms for theirs. Name’s not important, what is important is what it does. Basically it allows you to use a slower shutter speed and get a cleaner picture. Makes sense huh? Now here’s the thing to look out for: some cameras will have the VR/IS/OS in the lens by keeping the glass steady and some will have it inside the camera body by moving the sensor in the opposite direction to the camera body by using sensors similar to the iPhone/Pod’s accelerometer. People debate which is better, but I’ll leave it up to you because I haven’t done much research on the subject. Something to think about though, if you get the Vibration reduction in the lens, it will make future lenses more expensive because you’ll have to keep buying lenses with vibration reduction built in.

Auto focus system - Speaking of making lenses even more expensive than they already are, some cameras (such as my little D60) rely on having the auto focusing system inside the lens, so if it’s not, then the lens will not automatically focus. So I have to look out for that. Sigma call it HSM (Hyper Sonic Motor) and on Tamron it’s called AF. It will make the lens both heavier and more expensive. Super. Then there is the number of auto-focus points inside the camera. These appear as a line of little brackets as you look through the view finder. The D60 only has 3 and I don't know why they did this because it really can be quite finicky at the best of times, but it allows the camera to auto focus to the left, right and middle. I think 9 would be plenty so that it could auto focus to corners as well. The Nikon D3X has 51. 51!!!!

Live View - I touched on this before, waaaaay back at the start of the article. Remember that? Ahhh, good times. Good times. Anyway, Live View is basically displaying what is normally shown in the viewfinder on the LCD screen on the back, just like a point-and-shoot. Some people will call photographers who use this “phoneys” who might as well stick to point-and-shoots. I think those people can shove it. It’s a great system that I wish I had because these screens usually pop out and can tilt up or down, allowing you to hold the camera way up over your head to shoot over a crowd and still know exactly what you are aiming at. Brilliant.


LCD Screen Size - I don’t really see a problem with having a two and a half LCD compared to a three inch screen, but it seems like when it comes to the manufacturers, every millimeter counts. Unless you are quite blind then that extra half an inch isn’t going to do much other than raise the price so it’s up to personal preference.

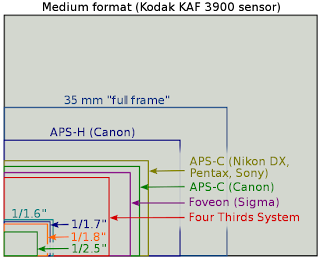
Sensor size/Type - “Do I go with Sigma’s Foveon system which has both up and downsides or an even smaller four thirds system? Although that does limit my range of lenses significantly. Can I justify spending the extra money to get a full frame sensor? Maybe I’ll just play it safe and go with an APS-C sensor, but then do I go with a CMOS or a CCD sensor?!?!?!” as you can see sensors are a minefield so I’m going to save pretty much all of it for it’s own post. I will, however, provide you with this little diagram so you can compare sizes. The sensors smaller than the four thirds system are from point-and-shoot cameras. Now you know why your DSLR’s pictures are much better quality!


This concludes Part 1! It's getting a bit long, so I'll bring you more terminology with Part 2 Dude, What's My Start Up Time? Thanks to Wikipedia for the diagrams and Sony for the stock photo.